


If you’ve ever had a professional shellac manicure, you’ll know how tough and glossy that finish can be. It’s long-lasting, chip-resistant, and perfect for busy people who don’t have time for touch-ups. Many Australians now prefer to remove shellac at home to save money and avoid unnecessary salon visits. This article walks you through how to remove shellac at home, step by step, using easy-to-find products and gentle techniques that keep your nails healthy and strong.
What is shellac?
Shellac nails consist of a combination of regular nail polish and gel, which results in a shiny and solid look when applied that lasts for at least two weeks or longer. It is mainly because of its strong bonding with the nail that shellac is not easily removed with just regular polish removers. An acetone-based solution and a certain method are needed to effectively break down the product.
What you’ll need?
Try to gather everything you need beforehand. Having the right tools and products will help a lot in making the process safer and more efficient.
Your supplies include:
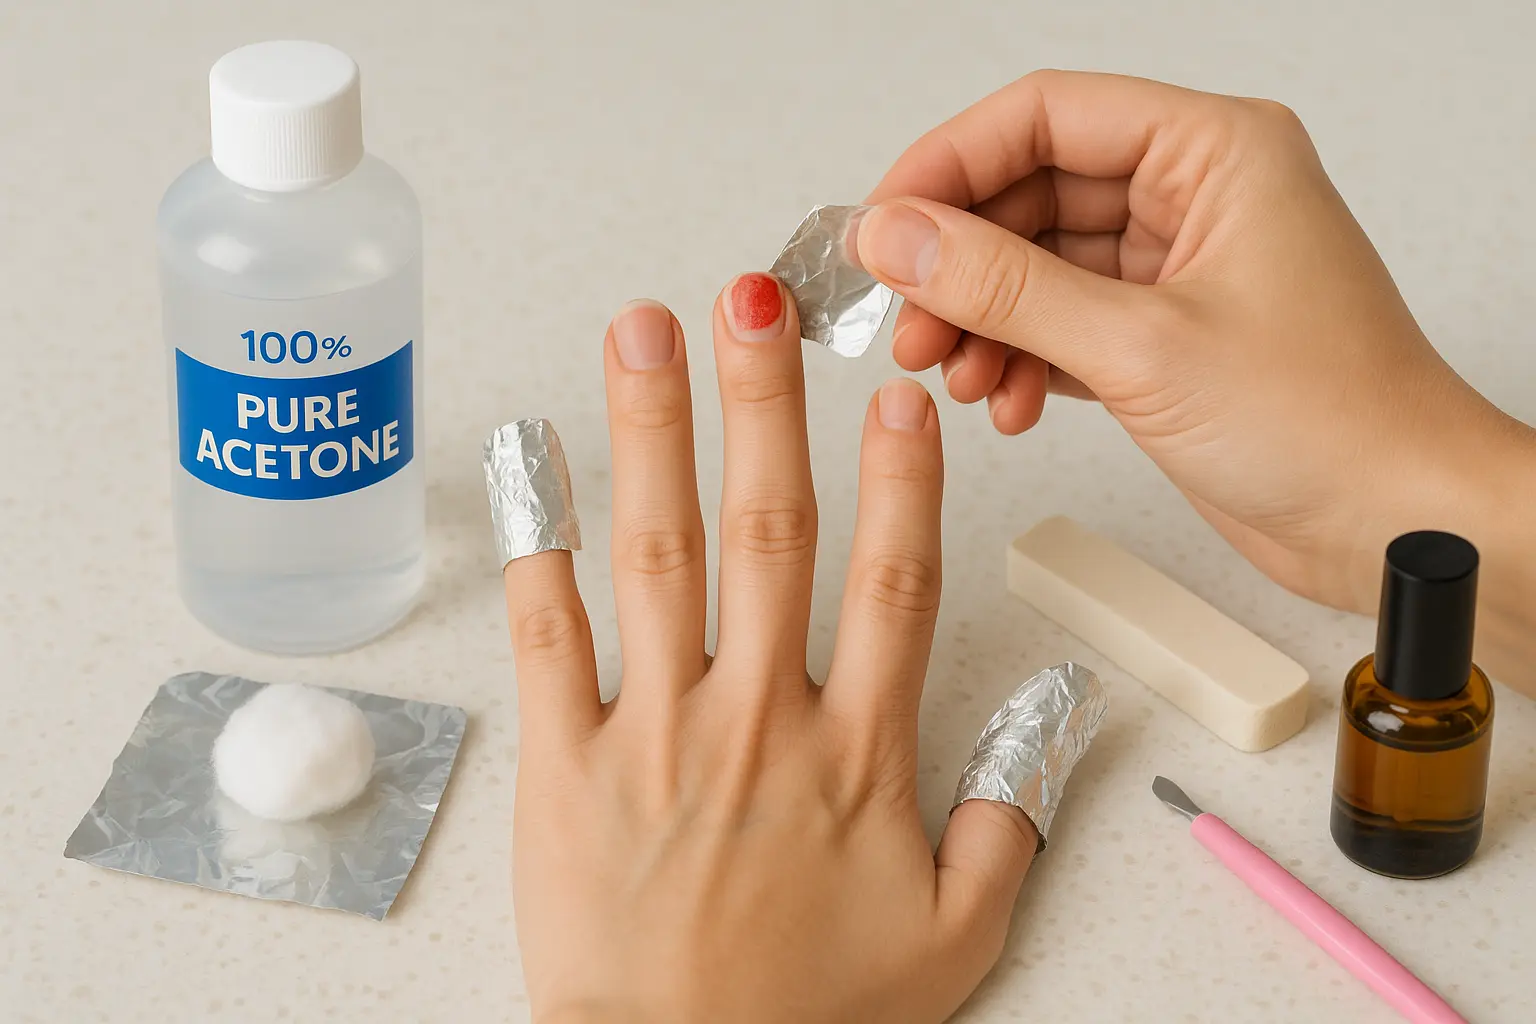
- 100% pure acetone
- Cotton balls or pads
- Aluminum foil (cut into smaller squares)
- A file or buffer for the nails
- A pusher for cuticles (wooden or plastic is preferable)
- Your choice of a good-quality hand moisturizer or cuticle oil
- Small bowl (optional, for those who prefer soaking)
Working in a ventilated area would be ideal to avoid the strong acrid smell of acetone. It would also be a good idea to have a towel or tissue to protect your work surface from spills.
How to remove shellac at home
Step 1: File the top coat
Begin with gently filing off the top shiny layer of your shellac polish. This procedure will help to some extent in the breaking of the seal, and thus the acetone penetration will be more effective. A fine-grit nail file should be used, and you are advised to move lightly over the surface of the nail.
Step 2: Soak the cotton pads
Cotton pads or balls must be soaked in pure acetone. The saturation must be complete but not to the extent of dripping. One soaked pad is to be placed on each nail, and utmost care is to be taken that the pad covers the entire nail area.
Step 3: Wait patiently
The foils on your nails must be left for about 10 to 15 minutes. This will give acetone the time to penetrate and loosen the shellac polish. Try not to move and limit your hand usage during this period.
Step 4: Gently remove the polish
After 15 minutes, you should take one of the wraps off to check whether the shellac has been removed already. The coating has to be flaky, soft, and thus easily removable. A cuticle pusher or an orange stick should be used to gently push off the loose polish with the aid of the nail.
Step 5: Buff and hydrate
The nails should be smoothed with a fine buffer after the last of the polish has been removed. Be nice and gentle just to remove the last bits of the residue—this is not about thinning the nails at all. After buffing, wash your hands with mild soap and warm water to ensure that all acetone has been removed.
Tips for protecting your nails after removal
Even when done correctly, removing shellac can leave nails feeling a little dry or brittle. Here’s how to keep them strong and healthy.
- Hydrate daily: Apply cuticle oil or hand cream frequently.
- Use a strengthening treatment: Try a keratin- or calcium-based nail hardener can be tried.
- Wear gloves: Keep your nails covered with gloves if doing house chores like cleaning or dishwashing to avoid exposure to water and chemicals.
- Keep a nail-friendly diet: Include foods rich in biotin, zinc, anprotein,in which are good for nails.
Common mistakes to avoid
Making mistakes when removing shellac at home can happen even if you have the best intentions. Things you should steer clear of:
- Peeling off the polish: It can cause the uppermost layers of your natural nail to get pulled off.
- Skipping the filing step: Proper penetration of acetone won’t happen unless the top coat is broken.
- Using regular nail polish remover: Only pure acetone is effective in shellac dissolution.
- Leaving nails bare and dry: Always rehydrate your nails after the procedure so as to avoid brittleness.
Final thoughts
Learning how to remove shellac at home is simple and cost-effective. The secret is being patient and gentle, using acetone correctly, and always following hydration. Don’t forget that nail health should be a priority. If you have the right technique, you can remove shellac at home, and your nails will still look healthy, smooth, and strong.